New Permit Format
Beginning in Building Permit version 2.5.1, a new format for configuring printed Permits is available to you. This new format allows additional flexibility in customizing the look of your Permits. The new configuration has the following features:
- You have the ability to set the font style/type (e.g. Times New Roman, Arial, Lucinda, etc.), in addition to the font size and properties (e.g. bold, italicized, etc.) with which individual Permit elements (or in some cases, groups of elements) are printed.
- You have the ability to suppress individual Permit elements so they are not included on the specific Permit.
- You have the ability to not make individual Permit types available for printing, without actually deleting the configuration for that permit type.
- Once you have configured one printed Permit configuration you can copy it as the basis for configuring other printed Permit configurations.
If you wish to upgrade you existing printed Permit configurations to the latest format, select Utilites | Town Settings | System Settings and press the button labeled Upgrade Printed Permit Configuration Format.
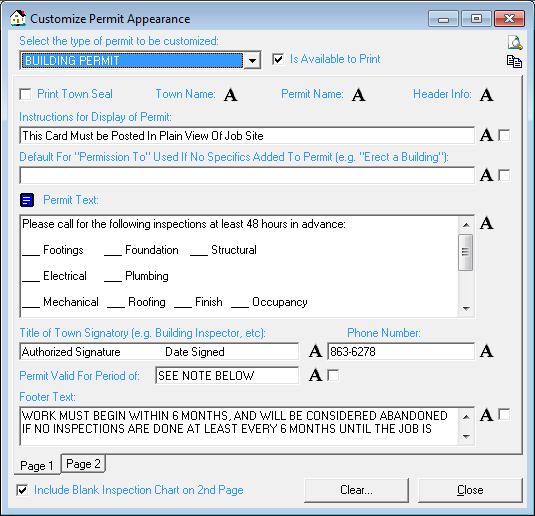
Once you have upgraded your Permit format, the Customize Permit Appearance dialog box will have the following icons and checkboxes to customize the Permit:
- The "Is Available to Print" checkbox, when checked, allows that Permit type to be available for printing. If you wish to not make an individual Permit type available to print, simply uncheck the "Is Available to Print" box.
- The Preview Custom Format icon
 allows you to view and print a sample of the Permit you are customizing.
- The Copy This Permit Setup To icon
 allows you to copy a configured printed Permit format to configure another Permit type. This is helpful if you have multiple Permit types you wish to configure that will have the same information.
- To suppress individual Permit elements so they are not included on the specific Permit, simply check the corresponding suppress checkbox next to the desired Permit element. Note, however, that you may have specific fonts available on your computer that other users in your department do not. If you select a font that is not available on each machine, the Permits may appear different when printed from other machines as the system will default back to the basic font when it cannot locate the font you selected. As a result, you should try to stick with standard fonts that will be available on everyone’s machines.
- A font settings button
 is available next to each text field for you to customize the font style/type, size, and properties (e.g. bold, italicized, etc.).
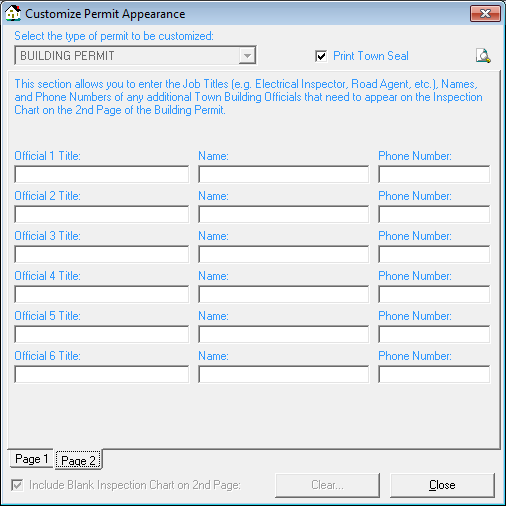
- Include Blank Inspection Chart on 2nd Page - This checkbox is only available when customizing the Building Permit and allows you to choose whether or not you want the second page of the Permit (or back of the Permit if you are duplexing it) to display a blank grid on which you can maintain information regarding various inspections. You can also include the names and phone numbers of additional town officials (e.g. Electrical Inspector, Road Agent, etc) that need to appear on the Inspection Chart. To enable the second page of the permit, check the "Include Blank Inspection Chart of 2nd Page" box. Two tabs will display at the bottom of the Customize Permit Appearance dialog box that says "Page 1" and "Page 2". The "Page 2" tab will display the town official fields.
The Permit format has the following customizable texts fields:
- Instructions For Display of Permit-Line that displays at the top of the Building Permit and generally says something such as "Display in a Conspicuous Location" or "Place Visible from Street." You have enough room for one line of text.
- Permit Text -The actual text of the middle section of the permit. You will want to recreate the text of your town's original Building Permit here. You have space for up to 4000 characters of text and you can enter blank lines before or after paragraphs. You have the ability to set the body section of any customized printable permit to Rich Text Format, allowing you more flexibility to modify portions of the text to bold, underline, justify, and/or change the font type. Using this, you can customize each permit to a specific format. To do so, select the Configuration Options from the Utilities menu. Within the Configuration Options dialog box, select the Permits Type tab. Once on the Permit Types tab, select the Customize Permit button in the lower right corner. This will open the Customize Permit Appearance dialog box, within which you can select the existing type of permit to be customized. After selecting the permit, select the text icon
 on the left side of the dialog box. You will be asked if you wish to convert this portion to Rich Text Format. Select Yes to proceed or select No to cancel.
- Permit Text Font Size - Sets the font size of the text you enter in the Permit Text field. If your text is shorter, you can use a larger font size to fill up the space more completely.
- Title of Town Signatory -Title of the town official who will be signing the Building Permit -- for example, "Code Enforcement Official" or "Building Inspector."
- Phone Number -Phone number at which the town official listed should be contacted.
- Permit Valid For Period of -Indicates the length of time for which the permit is valid. Depending on your current permit expiration configuration you may have to indicate in this field when the permit expires.
- Footer Text - Space at the bottom of the permit. The first line of the footer is automatically formatted to display the Permit's expiration period. The second two lines of the footer are customizable and can be used for additional warnings or messages -- for example "Permit Must Be Renewed Prior to Expiration Data" or "Permit Must be Returned to Code Enforcement upon Completion of Work."
Once you have upgraded your existing printed Permit configurations to the new format, you will notice when you print individual Permits you have additional options with which you can elect to print the Owner Address and Phone Number and/or the Applicant Name and Phone Number, in addition to Contractor information and Permit Notes.